When vacuum bagging, being able to ensure that your part remains under uniform pressure/vacuum will determine if a part will cure successfully. With the use of a vacuum switch in your bagging setup, a user can monitor the vacuum and automatically regulate pressure in real time. But sometimes the Hg setting needs to be adjusted for for the application and or materials being used.
WHAT IS A VACUUM SWITCH?
A vacuum switch is a pressure switch that measures vacuum pressure (Hg). It is used to monitor and or regulate the vacuum pressure when vacuum bagging and either starts or stops the pump when the desire vacuum is achieved. With an adjustable switch the user can adjust the point at which the pump will turn on or off.
Definition: Inches of mercury (“Hg) is a unit of measurement for gauging pressure or vacuum that is exerted.
The amount of pressure being applied during the vacuum bagging process can vary depending on what is being vacuum bagged. Settings for the switch can be adjusted by changing the Hg settings at which the switch operates. The ideal settings are 5”-8” Hg when bagging low density white foam, 12”-14” Hg for gray and pink foam and 15”-18” Hg is recommended when bagging higher density foam, such as blue foam or Spyder Foam. If required, higher vacuum up to 30” Hg can be used when bagging solid laminates into a mold.
HOW TO ADJUST THE AIRTROL F-4200-X SERIES VACUUM SWITCH
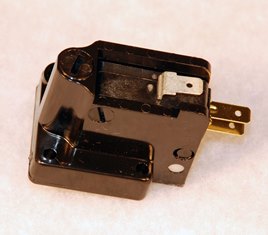
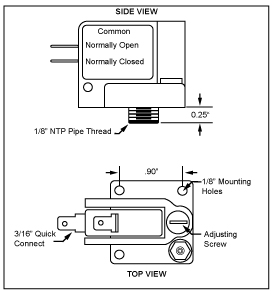 ACP’s Vacuum Switch, the F4200-X30-PT, is an inexpensive and reliable full range miniature vacuum switch with good sensitivity, repeatability and set point tolerance. The switch is adjustable from 1.5-30”Hg with a dead band of 2-3”Hg. It comes preset to shut a vacuum pump off when vacuum reaches 18” Hg, and then if the vacuum drops to 15” Hg is starts the pump back up automatically.
When different settings are required, the vacuum switch can be adjusted to start and stop between 1.5-30” Hg with a 2-3” Hg dead band. This means that the switch can be adjusted to start and stop within no less than 2” Hg of each other (i.e. it will stop the pump at 18” Hg and start it again at 16” Hg.)
Adjusting the switch can be achieved by raising and lowering the set-point, or set screw. This is done by loosening the steel lock ring and turning the electric switch housing clockwise to raise the set-point or counter clock-wise to lower the set-point.
Recommended process for adjusting the switch to have a 16”-18” Hg setting is as follows:
- Unplug the pump and clip off hose from the reservoir outlet.
- Holding the electric switch housing in position, turn the vacuum switch set screw counterclockwise two full turns.
- Plug the pump back in and check the reading on the vacuum gauge to see when the pump shuts off. If the reading is not at 18” Hg, unplug the pump and dump the vacuum to 0” Hg. This is done by releasing the clamp on the reservoir outlet hose and adjusting the switch accordingly. Continue this procedure until the pump shuts off 18” Hg. Make the adjustments in small increments of 1 or 2 degrees at a time.
- To check that the pump will turn on at 16” Hg, wait approximately five minutes after the pump has shut off at 18” Hg. Then slowly dump the vacuum. This will simulate a leak in the bag. When the gauge reaches 16” Hg it should turn the pump back on. Note: The reason for waiting the five minutes before dumping the vacuum is to allow the vacuum to dissipate from the top of the pump diaphragm. If an attempt is made to start the pump before the vacuum has dissipated across the diaphragm, the motor will stall and the pump will not start at the correct set-point.
- For best results, after re-setting the switch, cycle the system pressure level several times to stabilize a new set-point.